
How to Make a Media Wall with Water Vapor Fireplace: Step-by-Step Guide
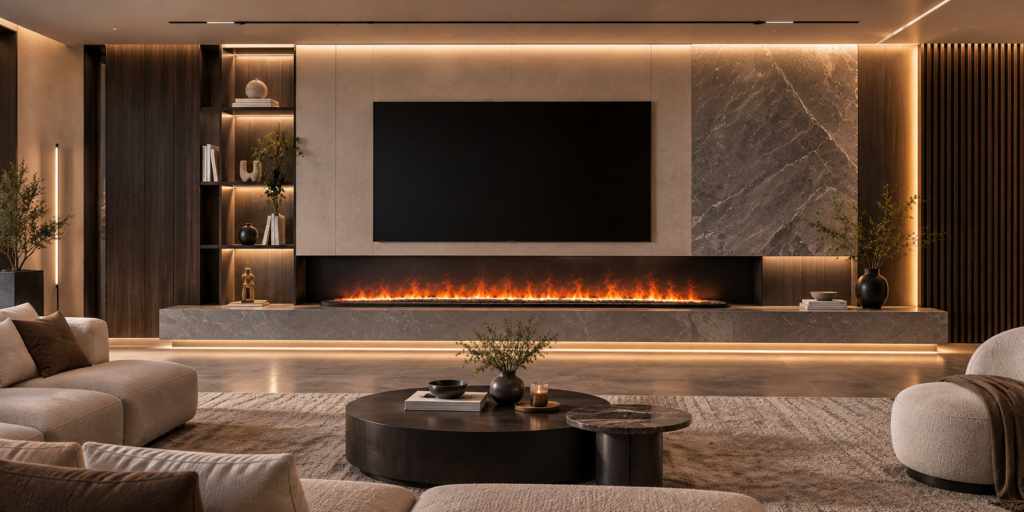
Designing a modern entertainment center that combines state-of-the-art visual technology with a cozy hearth used to be an architectural nightmare. Traditional gas and wood fireplaces emit intense heat and soot, making it dangerous to mount a television directly above them. However, mastering how to make a media wall with water vapor fireplace setups completely changes the game. By utilizing ultrasonic mist technology and LED lighting, ventless water vapor cassettes produce cool, tactile “flames” with absolute zero heat.
Whether you are a professional contractor, an interior designer, or a savvy DIY homeowner, here is a comprehensive, step-by-step guide on how to build a breathtaking, safe, and functional media wall featuring a mist fireplace.
Step 1: Planning, Layout, and Spatial Design
Before touching a single tool when figuring out how to make a media wall with water vapor fireplace layouts, meticulous planning is required to ensure structural harmony and safety.
- Determine Dimensions: Measure your television size and the overall wall space. A good rule of thumb is to center the water vapor cassette directly beneath the TV, leaving a clean, balanced gap between the top of the “flames” and the bottom of the screen.
- Select Your Fireplace Model: Choose a linear water vapor cassette that fits your layout. Decide beforehand whether you want a manual-fill water tank or a direct-plumbing connection for automated, maintenance-free water supply.
- Drafting the Blueprint: As emphasized in modern architectural planning guides by Architectural Digest, sketching out your framing dimensions and weight distributions ensures a smooth installation process.
Step 2: Constructing the Framework and Stud Wall
The skeleton of your entertainment center must be sturdy enough to support both the drywall and the heavy television mounting bracket.
- Build with Timber or Metal Studs: Construct a reinforced stud frame against the main wall using standard timber or metal studs.
- Create the Fireplace Niche: Build a precise recessed cavity or “rough opening” matching the exact manufacturer specifications of your water vapor fireplace cassette. Ensure there is enough clearance around the sides for easy insertion and removal.
- Reinforce the TV Mount Area: Install heavy-duty horizontal backing boards (noggins) within the stud framework exactly where the TV wall mount will be anchored.
Step 3: Managing Electrical and Water Utilities
Because water vapor fireplaces require power for their ultrasonic transducers, mist makers, and LED lights, proper utility planning is vital.
- Concealed Power Outlets: Install dedicated electrical outlets inside or directly behind the fireplace cavity, as well as behind the TV niche, so all cords remain completely hidden.
- Direct Plumbing Line (Optional): If your model supports continuous water feed, run a flexible water supply line and a small drainage or overflow tube into the fireplace cavity before closing up the walls.
- Smart Home Integration: As highlighted in smart home technology reviews by CNET, pre-wiring your entertainment center for smart plugs, LED strip lighting, or remote-control modules elevates the functionality of your modern living space.
Step 4: Drywalling, Finishing, and Surface Cladding
Once the framing and utilities are secured, it is time to close up the wall and apply your desired aesthetic finishes.
- Attach Fire-Resistant Dryboard: Screw fire-rated plasterboard or cement backer boards onto the stud frame, cutting out precise openings for the TV bracket and fireplace insert.
- Apply Surface Finishes: This is where your design comes to life. Frame the fireplace opening with high-end materials such as vertical fluted wooden acoustic slats, micro-cement, large-format porcelain slabs, or natural stone veneer.
- Zero Heat Advantage: Because mist fireplaces produce no thermal radiation, you do not need to install heavy firebrick insulation barriers or clearance mantels, giving you total freedom with your surface materials.
Step 5: Installing the Fireplace Insert and Testing
The final phase of learning how to make a media wall with water vapor fireplace builds brings all the components together into a stunning visual centerpiece.
- Slide in the Cassette: Carefully slide your linear water vapor fireplace insert into the prepared niche, connecting it to the concealed power source and water supply.
- Test the Mist and Lights: Fill the reservoir or turn on the direct water line, power on the unit, and adjust the LED flame height, speed, and color to match your desired mood.
- Mount Your TV: Secure your flat-screen television onto the reinforced wall mount above the fireplace, run your HDMI and audio cables through in-wall conduit pipes, and complete your ultimate entertainment setup.
Conclusion: Elevate Your Living Space Today
Learning how to make a media wall with water vapor fireplace designs opens up limitless possibilities for modern residential and commercial interiors. By eliminating the risks of heat damage, smoke, and complex chimney flues, you can achieve a sleek, luxurious entertainment hub that stuns guests and redefines comfort.
Ready to source high-end linear cassettes for your next project? [Contact our engineering team today] for custom sizing options, bulk wholesale catalogs, and professional installation blueprints!